A Minecraft network allows players to connect to multiple game modes through a single server address. Instead of managing separate IPs for each server, players join through a proxy that seamlessly directs them to different game modes like Survival, Skyblock, or minigames.
Network Architecture
Here is how a typical Minecraft network is structured:
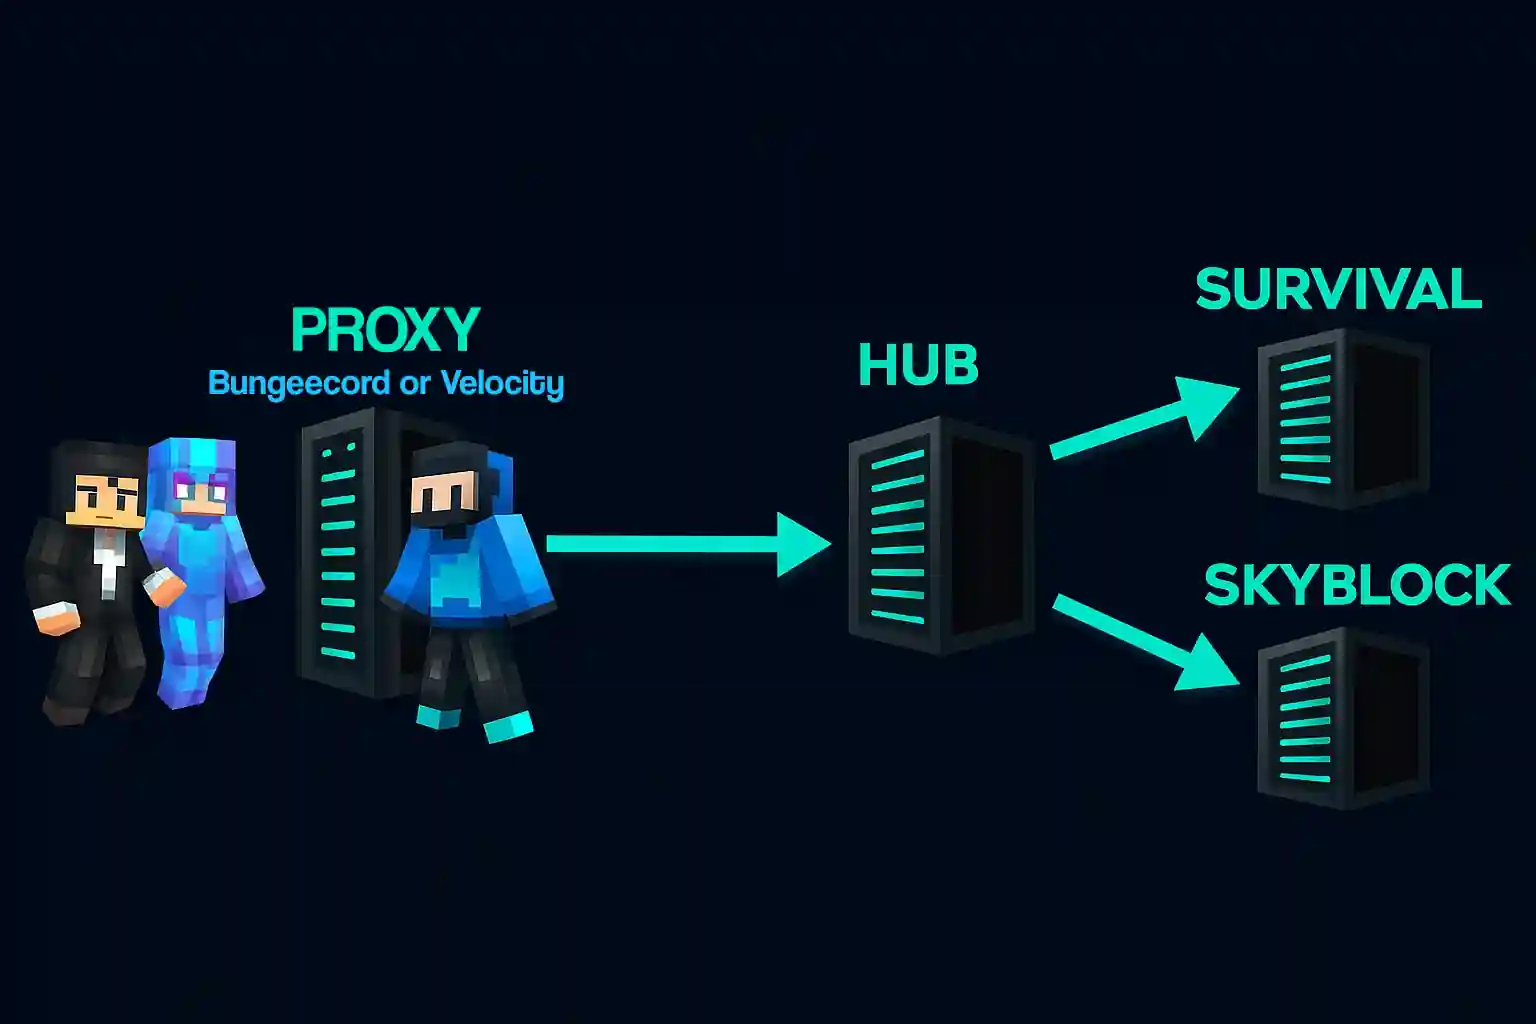
Players connect to your proxy server (Velocity or BungeeCord), which then routes them directly to a hub server. From the hub, players can walk into portals or click NPCs to choose between your different game modes.
Setting Up Your Network
Step 1: Order a Proxy Server
First, you will need a dedicated proxy server to manage all the incoming connections.
- MintServers offers dedicated proxy hosting at https://mintservers.com/order/view/26.
- During the ordering process, you can choose between BungeeCord or Velocity. We highly recommend Velocity for much better performance, security, and modern features!
Step 2: Set Up Your Hub Server
The hub (or lobby) server is where players first arrive after connecting to the proxy. It typically contains portals, server selectors, or NPCs to access your different game modes.
For a hub server, we recommend our Unlimited Standard plan, which provides ample resources for a smooth lobby environment.
🚀 Launch Your Unlimited RAM Game Server — Just $9.99/mo!Step 3: Add Game Servers
Now you can add your actual game servers (the nodes where the actual gameplay happens). The required resources depend entirely on your game mode and player count:
- Minigames/Skyblock: Usually require fewer resources as worlds are smaller.
- Survival/SMP: Require moderate to high resources depending on world size and mob farms.
- Modded Servers: Always require high RAM allocations to handle custom content.
Step 4: Configure Your Proxy
Once your servers are running, you will need to configure your proxy to recognize each backend server.
- Add each server's local IP and port to your proxy's configuration file (this is
velocity.tomlfor Velocity, orconfig.ymlfor BungeeCord). - Set your hub server as the default/fallback server so players always join there first when they log in.
For detailed, step-by-step setup instructions on making sure player IPs and UUIDs pass through correctly, check our Velocity forwarding configuration guide.
Final Steps
After configuration, restart your proxy server and test the connections. Players should now be able to join through your proxy's IP and seamlessly move between servers!
Remember to configure your permissions (like LuckPerms Bungee) and install any necessary proxy plugins for features like global network chat or synchronized ranks across your network.
🛠️ Need Network Help?
No worries! Let's get that network linked together perfectly. Setting up a proxy can be a bit tricky the first time. If you run into any "already connected to this proxy" errors or have trouble getting your nodes to talk to each other, just open a support ticket and our team will be happy to help you configure it.