


 Minecraft Java
Whether you are moving a beloved single-player world to a server or trying out a downloaded adventure map, uploading a custom world is an essential skill. This guide will walk you through the entire process, from locating your world to loading it on your server.
Uploading is now a simple drag and drop in the World Manager. There is no need for an FTP client, no file size limit to worry about, and no need to edit any server settings by hand.
To follow this guide, all you need is your world on your computer, either as a folder or as a .zip, .tar.gz, .rar or .7z archive. That is it! If you only want the quick version for a singleplayer world, see our guide on how to upload your Minecraft singleplayer world to a server.
Locate Your World File
First, you need to locate your world folder. The location depends entirely on whether you are using vanilla Minecraft or a custom modpack.
For Vanilla Minecraft:
- Open your Minecraft saves folder on your computer. On Windows, press Win+R and type
%appdata%\.minecraft\saves. On macOS it is~/Library/Application Support/minecraft/saves, and on Linux it is~/.minecraft/saves. - Find the folder with your specific world's name.
For CurseForge Modpacks:
- Open the CurseForge desktop application.
- Find your modpack in the My Modpacks tab.
- Click the three dots (⋮) next to the modpack.
- Select Open Folder.
- Navigate into the
savesfolder to find your world.
ℹ️ Downloaded a Map or Using Mods?
If your adventure map came as a .zip, .tar.gz, .rar or .7z file, you do not need to unzip it. Upload it as it is and the server will find the world inside. If your world was built with mods, your server needs to run the same mods or modpack, otherwise the world may fail to load.
Upload the World
Now we can send your world straight to the server. The server works out the rest.
- Log into your MintServers game panel.
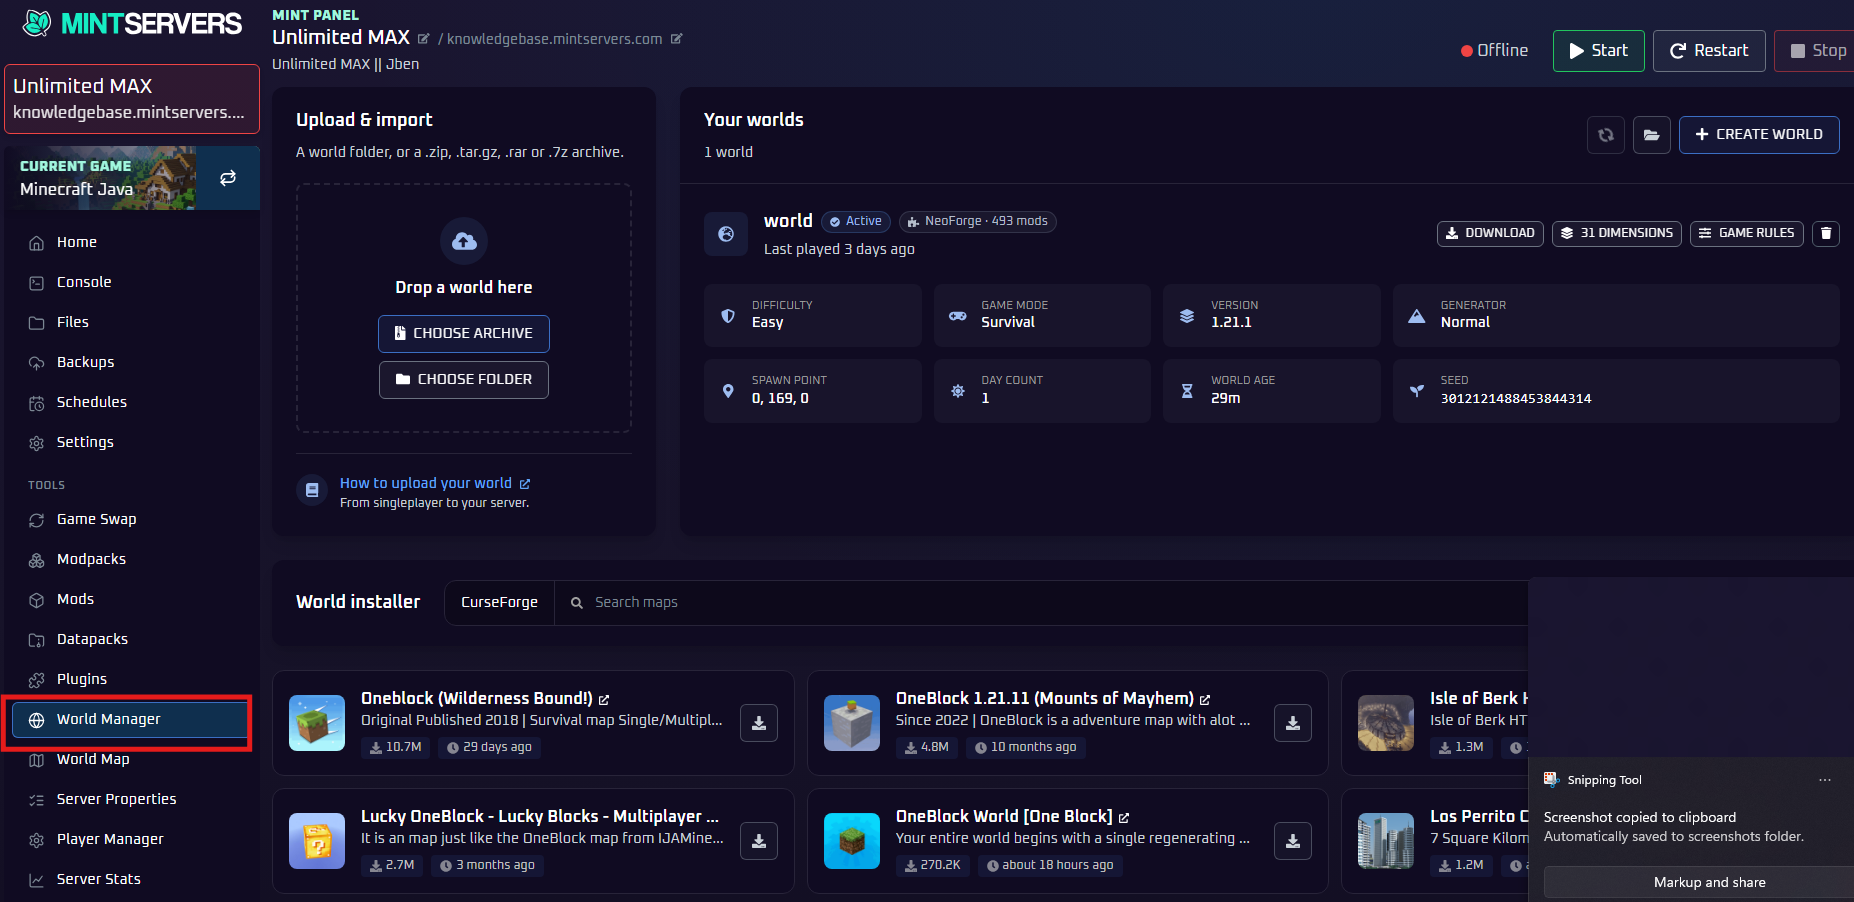
- Click on World Manager in the left sidebar, under Tools.
- In the Upload & import box, drag your world folder from your computer and drop it onto Drop a world here. You can also click Choose Folder and pick your world folder instead.
- The box will now show how many files you selected and their total size. Under World Name, type a name for your world (up to 48 characters).
- Choose your options:
- Make active: ticked by default. Your world will be loaded the next time the server starts.
- Replace existing world: tick this if you want your upload to replace the existing world. If you leave it unticked, a new name is used for your upload instead, so nothing is overwritten.
- Click Upload & Import. The box will show your progress as it moves through four stages: Uploading, Unpacking, Finding the world and Setting up. Keep the page open until it finishes. If you need to stop, click Cancel.
- When it is done, your world will appear under Your worlds, ready to use.
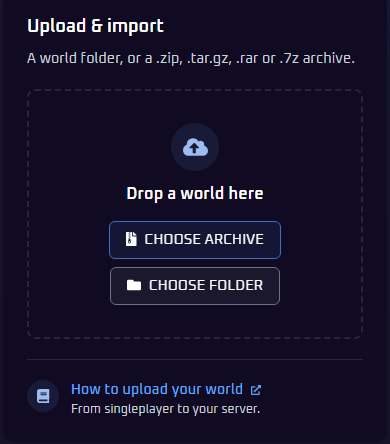
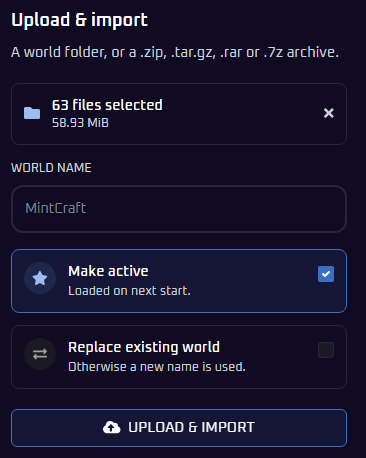
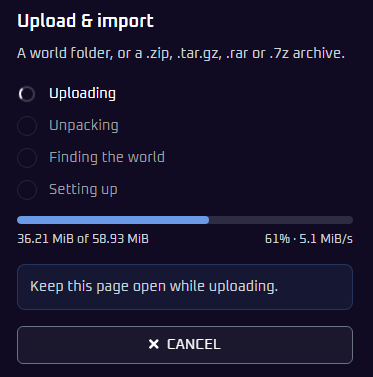
There is no file size limit, so even very large worlds (10 GB or more) can be uploaded this way. Large uploads simply take longer on a slower internet connection.
Planning to tick Replace existing world? Take a backup of your current world first, since the existing world will be replaced.
Start the Server with Your World
Once your world appears under Your worlds and is marked Active, go to the Console tab and Start your server!
You do not need to edit the level-name setting in Server Properties. As long as Make active was ticked when you uploaded, the World Manager takes care of loading your world on the next start.
ℹ️ Your Other Worlds Are Safe
Uploading a new world does not delete your existing ones unless you tick Replace existing world. Your other worlds stay stored on the server and are listed under Your worlds, they are just not the one being loaded.
Accessing Multiple Worlds at Once
The World Manager lists every world on your server and marks one of them as Active. The Active world is the main world that players will spawn in by default. If you have multiple worlds on your server (for example, your newly uploaded world and the old default 'world'), you cannot seamlessly access the other worlds without a special plugin or mod.
To manage multiple worlds and create portals or use commands to teleport between them, you will need a multi-world management plugin. The most popular choice for Spigot, Paper, and Bukkit servers is Multiverse-Core.
Troubleshooting
If you connect and see a fresh world instead of your uploaded one, make sure the upload finished completely before you started the server, and that your uploaded world appears under Your worlds on the World Manager page and is marked Active. If it is not marked Active, check that Make active was ticked when you uploaded it. Then restart the server and try again.
Uploading a custom world is a straightforward process that opens up endless possibilities for your server. By following these steps, you can bring any adventure map or legacy build you want to your MintServers host. The World Manager can also create brand new worlds and show your world's seed, which is covered in our guide on uploading your singleplayer world. If you run into any errors or your new world is crashing the server on startup, just open a support ticket and our team will be happy to help you get it sorted out!