


 Minecraft Bedrock
Bring your singleplayer Bedrock world to your server and play it with friends. Export it, drop it into your panel, and you are done!
📝 Coming From Minecraft Realms?
Follow our guide to uploading a Bedrock Realms world instead.
Method 1: Drag & Drop (Recommended)
📤
1. Export
Export your world as .mcworld
📦
2. Drop
Drag it into Bedrock Addons
⭐
3. Default
Set it as your default world
▶️
4. Start
Start your server
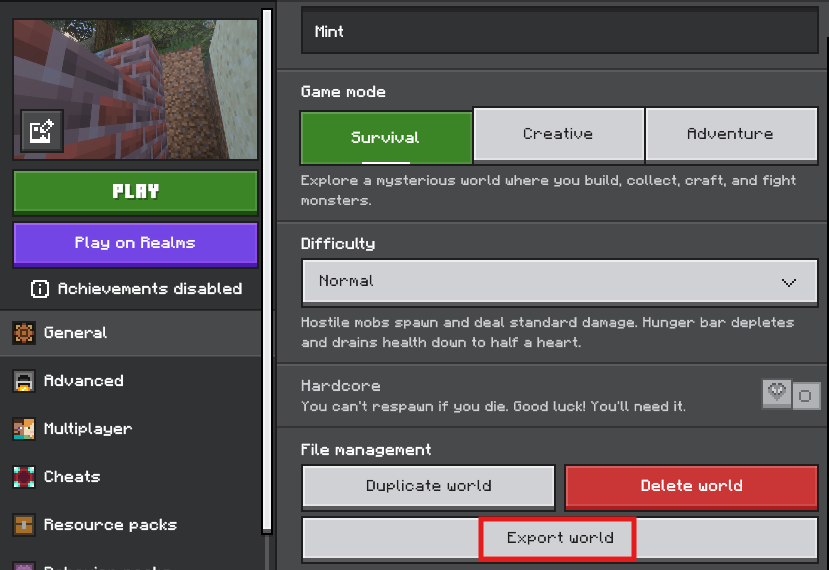
Step 1: Export Your World
- In Minecraft, click
Play, then the pencil icon next to your world. - Scroll down and click
Export World. - Save the
.mcworldfile somewhere easy to find, like your Desktop.
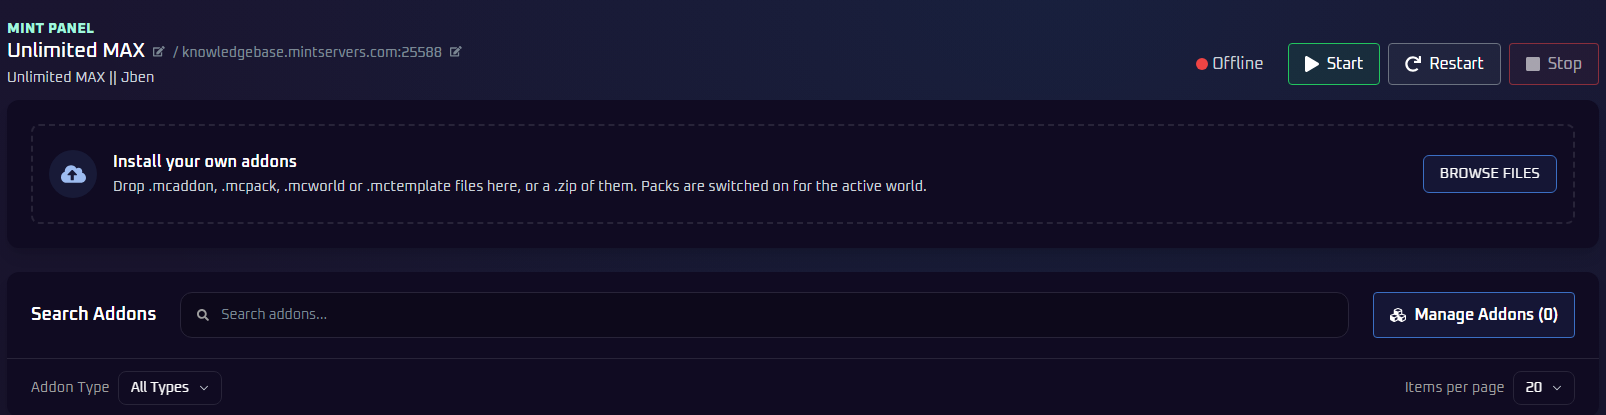
Step 2: Drop It Into Bedrock Addons
- On the
Consolepage, clickStop. - In the left sidebar, under
Tools, clickBedrock Addons. - Drag your
.mcworldfile onto theInstall your own addonsbox, or clickBrowse Filesand pick it. - Wait for
Installed 1 item. Remember the world name shown under it.
💡 Pro Tip:
Already have a world with that name? No worries! The new one is renamed automatically, like
Mint (2), instead of replacing the old one.
Step 3: Set It as Your Default World
⚠️ Do Not Skip This Step:
Your server will not play your world until it is set as default.
Your server will not play your world until it is set as default.
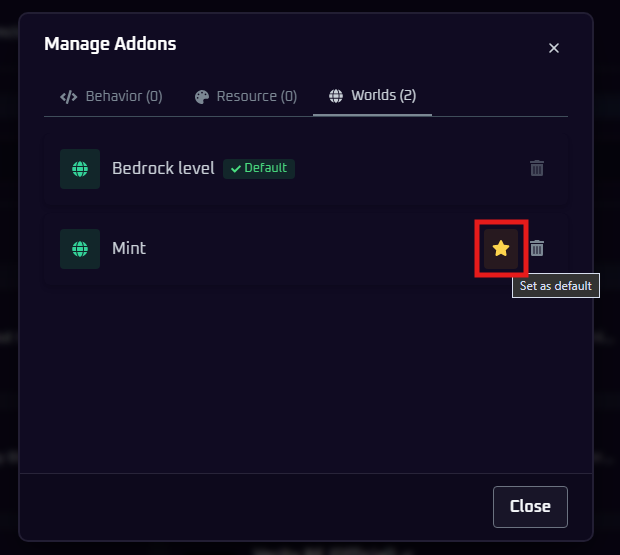
- Click
Manage Addonsat the top right. - Open the
Worldstab. - Click the star (
Set as default) next to your world. A greenDefaultbadge appears.
💡 Pro Tip:
Your other worlds stay in the list. Click their star to switch back anytime. The trash icon deletes a world, so be careful!
Step 4: Start Your Server
Click Start. Join your server and you will spawn right into your world. Have fun!

Method 2: Upload Manually
Have a very large world? Upload the folder yourself. This works great with SFTP.
Step 1: Zip Your World (Windows)
- Press
Windows + R, paste this path, and press Enter:
- Find your world folder. The names are random letters, so open
levelname.txtinside to check. - Right-click the folder and choose
Compress to ZIP file.
Step 2: Upload and Unarchive
- On the
Consolepage, clickStop. - Open the
Filestab, then theworldsfolder. - Click
Uploadand pick your.zipfile. - Right-click the
.zip(or click the three dots) and chooseUnarchive. Note the new folder's exact name.
📁 worlds
📁 YourWorldFolder (note this name)
📁 db
📄 level.dat
📄 levelname.txt
📄 level.dat
📄 levelname.txt
📝 Big Upload?
An SFTP client like FileZilla or WinSCP is faster and more reliable for large worlds. See our guide to connecting via SFTP.
Step 3: Point Your Server to Your World
- In the left sidebar, open
Bedrock Settingsand clickServer Properties. - Set
Level Nameto your world folder's exact name. - Go back to
Consoleand clickStart. Have fun!
🛠️ Troubleshooting Tips
- Server loads a new or wrong world? With Method 1, make sure your world has the
Defaultbadge. With Method 2, check thatLevel Namematches your folder name exactly. - Drag & drop upload struggling? Very large worlds upload better with Method 2 and SFTP.
Still stuck? No worries! Just open a support ticket and our team will gladly jump in and help.